RPG Tutorials
Welcome to a new tutorial! This time we will learn how to create a simple, and yet fully functional inventory for our RPG game(s). To keep things simple, I won't bother you with variable declarations and so on; you will discover their names and what they do as we discuss each line of code.
PANEL* inventory_pan =
{
bmap = inventory_tga;
pos_y = -2;
layer = 10;
flags = SHOW;
}
PANEL* armour_value_pan =
{
bmap = blue_pcx;
pos_x = 710;
pos_y = 490;
layer = 11;
flags = SHOW;
}
PANEL* attack_pan =
{
bmap = green_pcx;
pos_x = 710;
pos_y = 520;
layer = 11;
flags = SHOW;
}
PANEL* life_pan =
{
bmap = red_pcx;
pos_x = 710;
pos_y = 550;
layer = 11;
flags = SHOW;
}
PANEL* shield_pan =
{
bmap = shield_pcx;
pos_x = 715;
pos_y = 30;
layer = 11;
flags = SHOW;
on_click = use_shield;
}
PANEL* mace_pan =
{
bmap = mace_pcx;
pos_x = 730;
pos_y = 145;
layer = 11;
flags = SHOW;
on_click = use_mace;
}
PANEL* armor_pan =
{
bmap = armor_pcx;
pos_x = 710;
pos_y = 255;
layer = 11;
flags = SHOW;
on_click = use_armor;
}
PANEL* ring_pan =
{
bmap = ring_pcx;
pos_x = 710;
pos_y = 365;
layer = 11;
flags = SHOW;
on_click = use_ring;
}
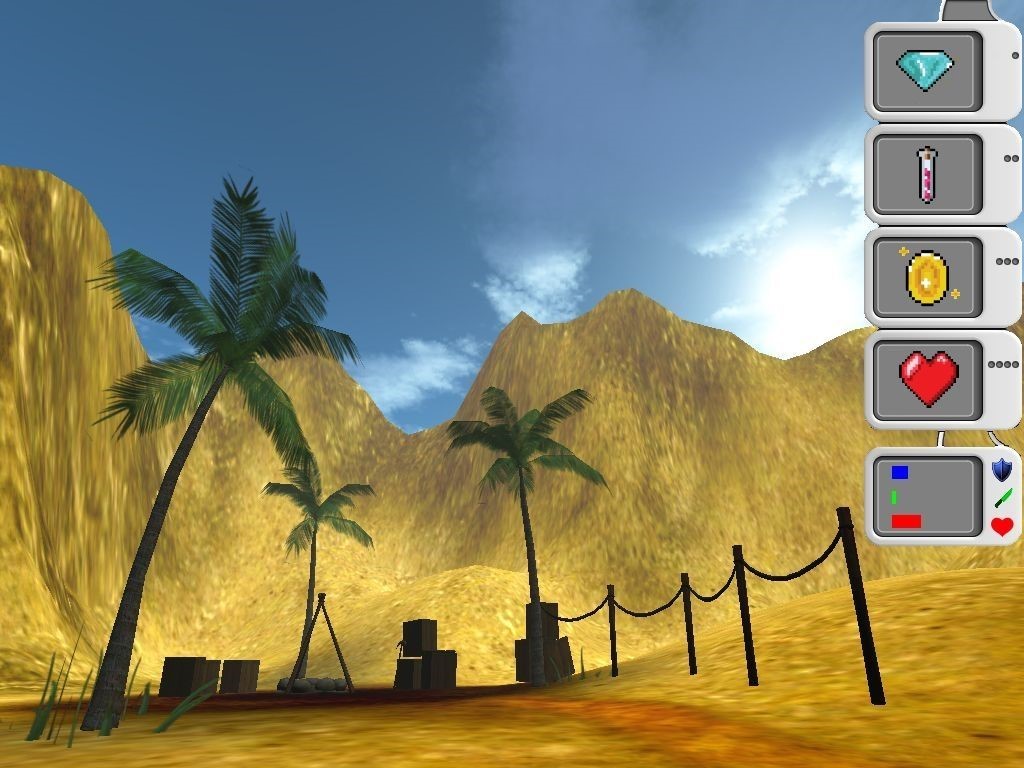
The code starts with several panel definitions; these are regular bitmaps that will be applied like a sticker over certain screen areas, covering them at all times. The 3D world continues to exist behind them, reacting to collisions, events, and so on, but it won't be visible to us.
The first panel is the big one which shows up on the right side of the screen in the picture above; the armor, attack, life, shield, mace, armor and ring panels are used for the RPG icons that are displayed in the inventory as soon as the player has picked them up. You will discover that all the panels have their "show" flag set; this means that they'll become visible as soon as the game is started.
The panels use various bitmaps and have different coordinates and layers; the ones with higher layers will be applied on top of those that have smaller "layer" values. Some panels also have on_click functions that are associated to them; this means that the "use_mace" function will be run each time the player clicks the corresponding panel using the left mouse button, for example.
When it comes to RPG inventories, we need a system that can keep track of all the items that have been picked up, used, and so on. Things can get complicated really fast, especially if we're talking about dozens, and sometimes even hundreds of different objects that can be interacted with.
The solution is to assign the items that can be added to our inventory different numbers. And to make sure that each number represents a unique combination of items, we will use the powers of two for each new object. This way we can easily keep track of dozens of RPG items using a single variable.
#define items skill30
#define armour skill41
#define attack skill42
#define life skill43
#define shield 1
#define mace 2
#define armor 4
#define ring 8
Our inventory code includes only four items, which have been assigned the 1 (2^0), 2 (2^1), 4 (2^2) and 8 (2^3) numbers, but you can expand the code by simply adding defines for stamina = 16 (2^4), mana = 32 (2^5), and so on.
function check_inventory()
{
while(1)
{
if(player.items > 0)
{
if(player.items == 1) // 1 + 0 + 0 + 0
{
set(shield_pan, SHOW);
reset(mace_pan, SHOW);
reset(armor_pan, SHOW);
reset(ring_pan, SHOW);
}
The code checks if player.items (just another name for player.skill30, check the definitions above) is greater than zero or not. If the answer is affirmative, the number is evaluated, and the proper items are displayed in the inventory panel. The code is very similar for all the possible combinations, so we won't discuss them all.
if(player.items == 2) // 0 + 2 + 0 + 0
{
set(mace_pan, SHOW);
reset(shield_pan, SHOW);
reset(armor_pan, SHOW);
reset(ring_pan, SHOW);
}
if(player.items == 3) // 1 + 2 + 0 + 0
{
set(shield_pan, SHOW);
set(mace_pan, SHOW);
reset(armor_pan, SHOW);
reset(ring_pan, SHOW);
}
if(player.items == 4) // 0 + 0 + 4 + 0
{
set(armor_pan, SHOW);
reset(shield_pan, SHOW);
reset(mace_pan, SHOW);
reset(ring_pan, SHOW);
}
if(player.items == 5) // 1 + 0 + 4 + 0
{
set(armor_pan, SHOW);
set(shield_pan, SHOW);
reset(mace_pan, SHOW);
reset(ring_pan, SHOW);
}
if(player.items == 6) // 0 + 2 + 4 + 0
{
set(armor_pan, SHOW);
set(mace_pan, SHOW);
reset(shield_pan, SHOW);
reset(ring_pan, SHOW);
}
if(player.items == 7) // 1 + 2 + 4 + 0
{
set(shield_pan, SHOW);
set(mace_pan, SHOW);
set(armor_pan, SHOW);
reset(ring_pan, SHOW);
}
if(player.items == 8) // 0 + 0 + 0 + 8
{
reset(shield_pan, SHOW);
reset(mace_pan, SHOW);
reset(armor_pan, SHOW);
set(ring_pan, SHOW);
}
if(player.items == 9) // 1 + 0 + 0 + 8
{
set(shield_pan, SHOW);
reset(mace_pan, SHOW);
reset(armor_pan, SHOW);
set(ring_pan, SHOW);
}
if(player.items == 10) // 0 + 2 + 0 + 8
{
reset(shield_pan, SHOW);
set(mace_pan, SHOW);
reset(armor_pan, SHOW);
set(ring_pan, SHOW);
}
if(player.items == 11) // 1 + 2 + 0 + 8
{
set(shield_pan, SHOW);
set(mace_pan, SHOW);
reset(armor_pan, SHOW);
set(ring_pan, SHOW);
}
if(player.items == 12) // 0 + 0 + 4 + 8
{
reset(shield_pan, SHOW);
reset(mace_pan, SHOW);
set(armor_pan, SHOW);
set(ring_pan, SHOW);
}
if(player.items == 13) // 1 + 0 + 4 + 8
{
set(shield_pan, SHOW);
reset(mace_pan, SHOW);
set(armor_pan, SHOW);
set(ring_pan, SHOW);
}
if(player.items == 14) // 0 + 2 + 4 + 8
{
reset(shield_pan, SHOW);
set(mace_pan, SHOW);
set(armor_pan, SHOW);
set(ring_pan, SHOW);
}
if(player.items == 15) // 1 + 2 + 4 + 8
{
set(shield_pan, SHOW);
set(mace_pan, SHOW);
set(armor_pan, SHOW);
set(ring_pan, SHOW);
}
}
The code snippet below is executed if the player hasn't picked up any of the items yet.
else
{
reset(shield_pan, SHOW);
reset(mace_pan, SHOW);
reset(armor_pan, SHOW);
reset(ring_pan, SHOW);
}
mouse_map = cursor_tga;
vec_set(mouse_pos,mouse_cursor);
if((player.life > 0) && (mouse_right))
{
mouse_mode = (mouse_mode + 2) % 4;
while(mouse_right == 1){wait(1);}
}
wait(1);
}
}
If the inventory is empty, the shield, mace, armor and ring panels are hidden, being made invisible. The mouse pointer can be moved around and will give the player the ability to use the inventory if it is alive, by clicking the right mouse button.
function attach_item()
{
proc_mode = PROC_LATE;
set(my,PASSABLE);
while(player != NULL)
{
vec_set(my.x, player.x);
vec_set(my.pan, player.pan);
my.frame = player.frame;
my.next_frame = player.next_frame;
wait(1);
}
}
These items may look nice on the screen, but they're just 2D bitmaps, so their 3D counterparts must be attached to/used by the player in the 3D level as well. The function above ensures that each 3D model that's created at runtime is properly attached to the player model.
The "real" items will be placed at the end of the function processing list to ensure that no lag is visible. They are made passable, because they shouldn't hinder player's movement. A loop that runs for as long as the player entity exists ensures that the position, angles and animation frames of the inventory items sync with the player.
action shield_init()
{
set(my,PASSABLE);
my.ambient = 80;
while(player == NULL){wait(1);}
while(vec_dist(my.x,player.x) > 50)
{
ent_animate(my,"idle", my.skill20,ANM_CYCLE);
my.pan += 1 * time_step;
my.skill20 += 3 * time_step;
wait(1);
}
snd_play(pickedup_wav, 80, 0);
player.items += shield;
ent_remove(me);
}
The shield_init action is attached to the shield model that's placed in the level. It makes the shield passable, sets its ambient value to 80, and then waits until the player model is loaded. Then, the code waits until the player comes closer than 50 units to the shield model, playing its "idle" animation. Things change when the player comes close enough; a "pickedup_wav" sound is played, player.items gets set to a new value, and then the shield model is removed because it's useless now.
Things happen the same for the rest of the actions below, so I won't comment their code.
action mace_init()
{
set(my,PASSABLE);
my.ambient = 80;
while(player == NULL){wait(1);}
while(vec_dist(my.x,player.x) > 50)
{
ent_animate(my,"idle", my.skill20,ANM_CYCLE);
my.pan += 1 * time_step;
my.skill20 += 3 * time_step;
wait(1);
}
snd_play(pickedup_wav, 80, 0);
player.items += mace;
ent_remove(me);
}
action armor_init()
{
set(my,PASSABLE);
my.ambient = 80;
while(player == NULL){wait(1);}
while(vec_dist(my.x,player.x) > 50)
{
ent_animate(my,"idle", my.skill20,ANM_CYCLE);
my.pan += 1 * time_step;
my.skill20 += 3 * time_step;
wait(1);
}
snd_play(pickedup_wav, 80, 0);
player.items += armor;
ent_remove(me);
}
action ring_init()
{
set(my,PASSABLE);
my.ambient = 80;
while(player == NULL){wait(1);}
while(vec_dist(my.x,player.x) > 50)
{
ent_animate(my,"idle", my.skill20,ANM_CYCLE);
my.pan += 1 * time_step;
my.skill20 += 3 * time_step;
wait(1);
}
snd_play(pickedup_wav, 80, 0);
player.items += ring;
ent_remove(me);
}
The following functions are run when the player clicks the proper panels in the inventory, using the desired items. The snippet below shows what happens when the player clicks the "shield" inventory object; the code waits until the left mouse button is released, plays a sound, removes the shield icon from the panel by setting a proper player.items value, creates the actual shield (a 3D model) and increases player's life with 30 units. Things are similar for the mace and armor, so we won't comment their code.
function use_shield()
{
while (mouse_left) {wait (1);}
snd_play(use_wav, 100, 0);
player.items -= shield;
ent_create(shield_mdl, player.x, attach_item);
player.life += 30; // bigger hbar
}
function use_mace()
{
while (mouse_left) {wait (1);}
snd_play(use_wav, 100, 0);
player.items -= mace; // remove the mace from the panel
ent_create(mace_mdl, player.x, attach_item);
player.attack += 50; // bigger hbar
t_mace = ent_create(mace_mdl, player.x, t_attach_mace);
}
function use_armor()
{
while (mouse_left) {wait (1);}
snd_play(use_wav, 100, 0);
player.items -= armor; // remove the armor from the panel
ent_create(armor_mdl, player.x, attach_item);
player.armour += 40; // bigger hbar
}
The fire item is a bit more complex, because it has to produce real damage around it. The code does this by using the c_scan instruction, which scans the surrounding environment using a pan angle of 360 degrees, a tilt angle of 90 degrees and a range of 70 units. Basically, the fire will determine if there are any entities in the area, and if the answer is affirmative, it will hurt them.
function fire_action()
{
set(my, PASSABLE | BRIGHT);
my.ambient = 100;
my.pan = random(360);
while(my.pan < 1500)
{
c_scan(my.x, my.pan, vector(360, 90, 70), IGNORE_ME | SCAN_ENTS);
my.pan += (5 + random(3)) * time_step;
my.z -= 0.4 * time_step;
wait(1);
}
ent_remove (me);
}
The function that uses the fire ring is complex as well; we're creating damage using the code above, but we need to show some flames as well. That's exactly what the code in the function below does, by using the sin and cos functions to create a circle with a radius of 100 units around the player.
function use_ring()
{
while (mouse_left) {wait (1);}
snd_play(use_wav, 100, 0);
VECTOR temp;
var temp_angle = 0;
if is (ring_pan, SHOW)
{
player.items -= ring;
while (mouse_left) {wait (1);}
while (!mouse_left) {wait (1);}
while(temp_angle < 400)
{
temp_angle += 2;
temp.x = player.x + 100 * cos(temp_angle);
temp.y = player.y + 100 * sin(temp_angle);
temp.z = player.z;
ent_create(ringoffire_tga, temp.x, fire_action);
}
}
}
The last function in this tutorial is a startup, a function that runs automatically at game start, just like function main. The code wait until the player model is loaded, and then it sets the position for all the panel/inventory items in relation with the big inventory panel.
function panels_startup()
{
while (!player) {wait (1);}
while (1)
{
inventory_pan.pos_x = screen_size.x - bmap_width(inventory_tga);
shield_pan.pos_x = inventory_pan.pos_x + 37;
shield_pan.pos_y = inventory_pan.pos_y + 45;
mace_pan.pos_x = inventory_pan.pos_x + 50;
mace_pan.pos_y = inventory_pan.pos_y + 150;
armor_pan.pos_x = inventory_pan.pos_x + 37;
armor_pan.pos_y = inventory_pan.pos_y + 250;
ring_pan.pos_x = inventory_pan.pos_x + 37;
ring_pan.pos_y = inventory_pan.pos_y + 352;
armour_value_pan.pos_x = inventory_pan.pos_x + 30;
armour_value_pan.pos_y = inventory_pan.pos_y + 468;
attack_pan.pos_x = inventory_pan.pos_x + 30;
attack_pan.pos_y = inventory_pan.pos_y + 493;
life_pan.pos_x = inventory_pan.pos_x + 30;
life_pan.pos_y = inventory_pan.pos_y + 517;
wait (1);
}
}
That's all for now! Stay tuned for the following tutorial, which will introduce dangerous enemies.